home > blogs > wordpress
Enhance Your WordPress Blog with an Email Form
You can add an email form to your Wordpress blog as an easy way for your readers to contact you. Unfortunately, I have not found a way to place email forms within your blog if you are using the hosted version of WordPress. This is due to the fact that the online version of WordPress strips form related HTML tags from your posts.
Fortunately, WordPress is easily self-hosted and with the benefit of a plugin called Raw HTML, it is pretty easy to place forms within your blog. You can choose to either add your form to an individual blog post or a static page linked from every page of your blog. These two options are outlined below.
Please view our demonstation WordPress blog here.
Add an Email Form to a WordPress Blog Post
Before you go through this tutorial you must have a copy of WordPress downloaded and installed on your own web server. This tutorial does not work if you are using a version of the blog hosted by WordPress. You may download your copy of WordPress here. Instructions for installing WordPress can be found at WordPress.org.
1. Prepare Your Contact Form HTML
myContactForm.com is a quick, easy, and free way to generate the HTML form code that you will be embedding into your blog. You can read our full write-up for using myContactForm.com tutorial here.
2. Download and Install the Raw HTML Plugin
The Raw HTML plugin is needed because WordPress automatically strips the HTML from your blog posts. By installing the Raw HTML plugin, you are able to insert HTML straight into your posts without having the HTML changed by WordPress.
To install Raw HTML:
a. Download the Plugin Here.
b. Follow the installation instructions found within the plugin readme file.
3. Login to Your WordPress Account
a. Go to the login page for your self-hosted WordPress blog.

4. Create a New Post
a. Under Posts select Add New

5. Write the New Post
a. Write your new post as you would normally do in WordPress.

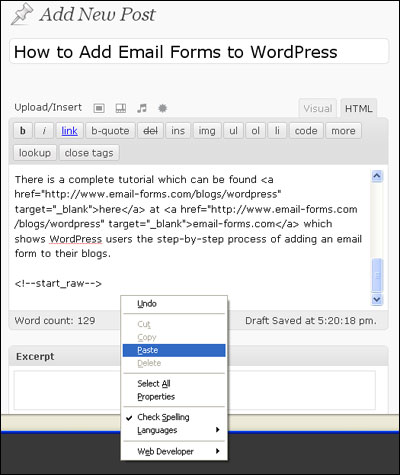
b. Once you get to the point in your post where you would like your email form, click the HTML tab.

c. At the point in the post where you would like the form, type in the following code:
<!--start_raw-->
d. Directly after the above code, paste the form HTML code (Edit > Paste, or CTRL+V, or Right Click and Select Paste). If you do not have your form code created and copied, please read this tutorial to learn how to do so.
e. Once you have pasted the form HTML code, type in the following line of code directly after the form HTML.
<!--end_raw-->
f. Once you have pasted your code, you will need to make a few changes manually in order to ensure that WordPress formats it correctly.
1. Get rid of any new lines (hard returns) that are within the HTML code. When WordPress goes to publish the post, it will interpret these as new lines and replace them with line breaks <br>, adding excessive white space to your form.
2. Make sure the elements of your form work with the template layout for your blog. I've found that making the form too wide or individual question fields too wide will ofter break the form. You may need to experiment with your form in order to ensure it works with the layout.
5. Publish the Blog Post
Once your form code has been pasted into your post, Click ![]() .
.
A fully functioning demonstration form hosted on WordPress can be seen here.
Adding an Email Form as a Page Within WordPress
Before you go through this tutorial you must have a copy of WordPress downloaded and installed on your own web server. This tutorial does not work if you are using a version of the blog hosted by WordPress. You may download your copy of WordPress here. Instructions for installing WordPress can be found at WordPress.org.
1. Design the Email Form
myContactForm.com a piece of free email form software that allows you to easily build a form for your Wordpress Site. Our myContactForm.com tutorial can be read, here.
2. Download and Install the Raw HTML Plugin
The Raw HTML plugin is needed because WordPress automatically strips the HTML from your blog posts. By installing the Raw HTML plugin, you are able to insert HTML straight into your posts without having the HTML changed by WordPress.
To install Raw HTML:
a. Download the Plugin Here.
b. Follow the installation instructions found within the plugin readme file.
3. Login to your WordPress Account
a. Go to the login page for your self-hosted WordPress blog.
4. Create a New Page
a. Under Pages select Add New

5. Write the New Page
a. Write your new page as you would normally do in WordPress.

b. Once you get to the point in your page where you would like your email form, click the HTML tab.
c. At the point in the page where you would like the form, type in the following code:
<!--start_raw-->
d. Directly after the above code, paste the form HTML code (Edit > Paste, or CTRL+V, or Right Click and Select Paste). If you do not have your form code created and copied, please read this tutorial to learn how to do so.

e. Once you have pasted the form HTML code type in the following line of code directly after the form HTML.
<!--end_raw-->
f. Once you have pasted your code, you will need to make a few changes manually in order to ensure that WordPress formats it correctly.
1. Get rid of any new lines (hard returns) that are within the HTML code. When WordPress goes to publish the post, it will interpret these as new lines and replace them with line breaks <br>, adding excessive white space to your form.
2. Make sure the elements of your form work with the template layout for your blog. I've found that making the form too wide or individual question fields too wide will ofter break the form. You may need to experiment with your form in order to ensure it works with the layout.
5. Publish the Blog Page
Once your form code has been pasted into your page, Click ![]() .
.
A fully functioning form hosted on WordPress can be seen here.