home > blogs > blogger
Add a Contact Form to Your TypePad Blog
Email forms allow you to add another level of interactivity to your TypePad blog. You can choose to either add your form to an individual blog post, a new page, or to the side bar featured on every page of your blog. All of these options are outlined below.
An example form hosted on TypePad can be seen here.
Adding an Email Form to a TypePad Blog Post
1. Build Your Form HTML Code
Before getting started with this tutorial, please first create your form code. The easiest way to do this is to use a free email form service called myContactForm.com, a simple and easy piece of form creation software that allows you to create completely custom web forms.
We have written a full tutorial for using myContactForm.com: here.
2. Login to your TypePad Account
a. Go to TypePad.com, click Sign In, and then login to your account.

3. Create a New Post
a. Click Begin a new post

4. Write the New Post
a. Write your new post as you would regulary do in TypePad.

b. Once you get to the point in your post where you would like your email form, click the Edit HTML tab.

c. At the point in the post where you would like the form, paste the form HTML code (Edit > Paste, or CTRL+V, or Right Click and Select Paste).

c. Once you have pasted your code, you will need to make a few changes manually in order to ensure that TypePad formats it correctly.
1. Get rid of any new lines (hard returns) that are within the HTML code. When TypePad goes to publish the post, it will interpret these as new lines and replace them with line breaks <br>, adding excessive white space to your form.
2. Make sure the elements of your form work with the template layout for your blog. I've found that making the form too wide or individual question fields too wide will ofter break the form. You may need to experiment with your form in order to ensure it works with the layout.
5. Publish the Blog Post
Once your form code has been pasted into the post, Click ![]()
A fully functioning demonstration form hosted on TypePad can be seen here.
Adding an Email Form to a New TypePad Page
1. Build the Form HTML Code
The first step is to create the form HTML code using a free form service, such as myContactForm.com.
2. Login to your TypePad Account
a. Go to TypePad.com, click Sign In, and then login to your account.
3. Create a New Page
a. Click Pages

b. Click Compose a new page

4. Write the New Page
a. Write your new page as you would regulary do in TypePad.

b. Once you get to the point in your post where you would like your email form, click the Edit HTML tab.
c. At the point in the page where you would like the form, paste the form HTML code (Edit > Paste, or CTRL+V, or Right Click and Select Paste).

c. Once you have pasted your code, you will need to make a few changes manually in order to ensure that TypePad formats it correctly.
1. Get rid of any new lines (hard returns) that are within the HTML code. When TypePad goes to publish the post, it will interpret these as new lines and replace them with line breaks <br>, adding excessive white space to your form.
2. Make sure the elements of your form work with the template layout for your blog. I've found that making the form too wide or individual question fields too wide will often break the form. You may need to experiment with your form in order to ensure it works with the layout.
5. Publish the Blog Page
Once your form code has been pasted into the post, Click ![]()
A fully functioning demonstration form hosted on TypePad can be seen here.
6. Check to Make Sure the Pages Module is Active
a. Click the Weblogs tab and then the Design tab.

b. Select the Pages Module and then click ![]()

Adding an Email Form to the Side Bar in TypePad
1. Design and Create the Form
Before getting started with this tutorial, please first create your form code. The easiest way to do this is to use a free email form service called myContactForm.com.
2. Login to your TypePad Account
a. Go to TypePad.com, click Sign In, and then login to your account.
3. Add Email Form to Sidebar
a. Click Weblogs Tab.

b. Click More actions > Manage this weblog

c. Click the Design Tab.

d. Click Content

e. Select Embed you own HTML under Modules and then click the Add this Module button.

f. Give your custom HTML a Label and paste your form HTML into the HTML box
(Edit > Paste, or CTRL+V, or Right Click and Select Paste).
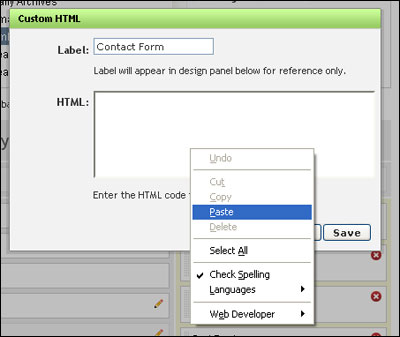
e. Once you have pasted your code, you will need to make a few changes manually in order to ensure that TypePad formats it correctly.
1. Get rid of any new lines (hard returns) that are within the HTML code. When TypePad goes to publish the post, it will interpret these as new lines and replace them with line breaks <br>, adding excessive white space to your form.
2. Make sure the elements of your form work with the template layout for your blog. I've found that making the form too wide or individual question fields too wide will often break the form. You may need to experiment with your form in order to ensure it works with the layout. Generally a 95% wide form works well.
d. Click ![]()
e. Your new Email Form will now appear in your blog's right column.

A fully operational demonstration form hosted on TypePad can be seen here.